Yushario
日本語ENStart your adventure

GUIDE

Get started

From launch to adopting your first quest. Follow along with the screens.

START

Your first quest.

All you need is your usual project and
a logged-in agent CLI.

  1. STEP 01

    Launch it locally

    Open a terminal in your project's folder and run the following command.

    TERMINAL
    npx yushario@latest

    A town opens in your local browser. Don't share the token in the launch URL.

WALKTHROUGH

Follow along, screen by screen.

The example is a "Fix a bug in town" quest. Compare the yellow numbers with the notes as you go from embarking to checking the result. Click an image to open it at full size.

MAP

Two places to know.

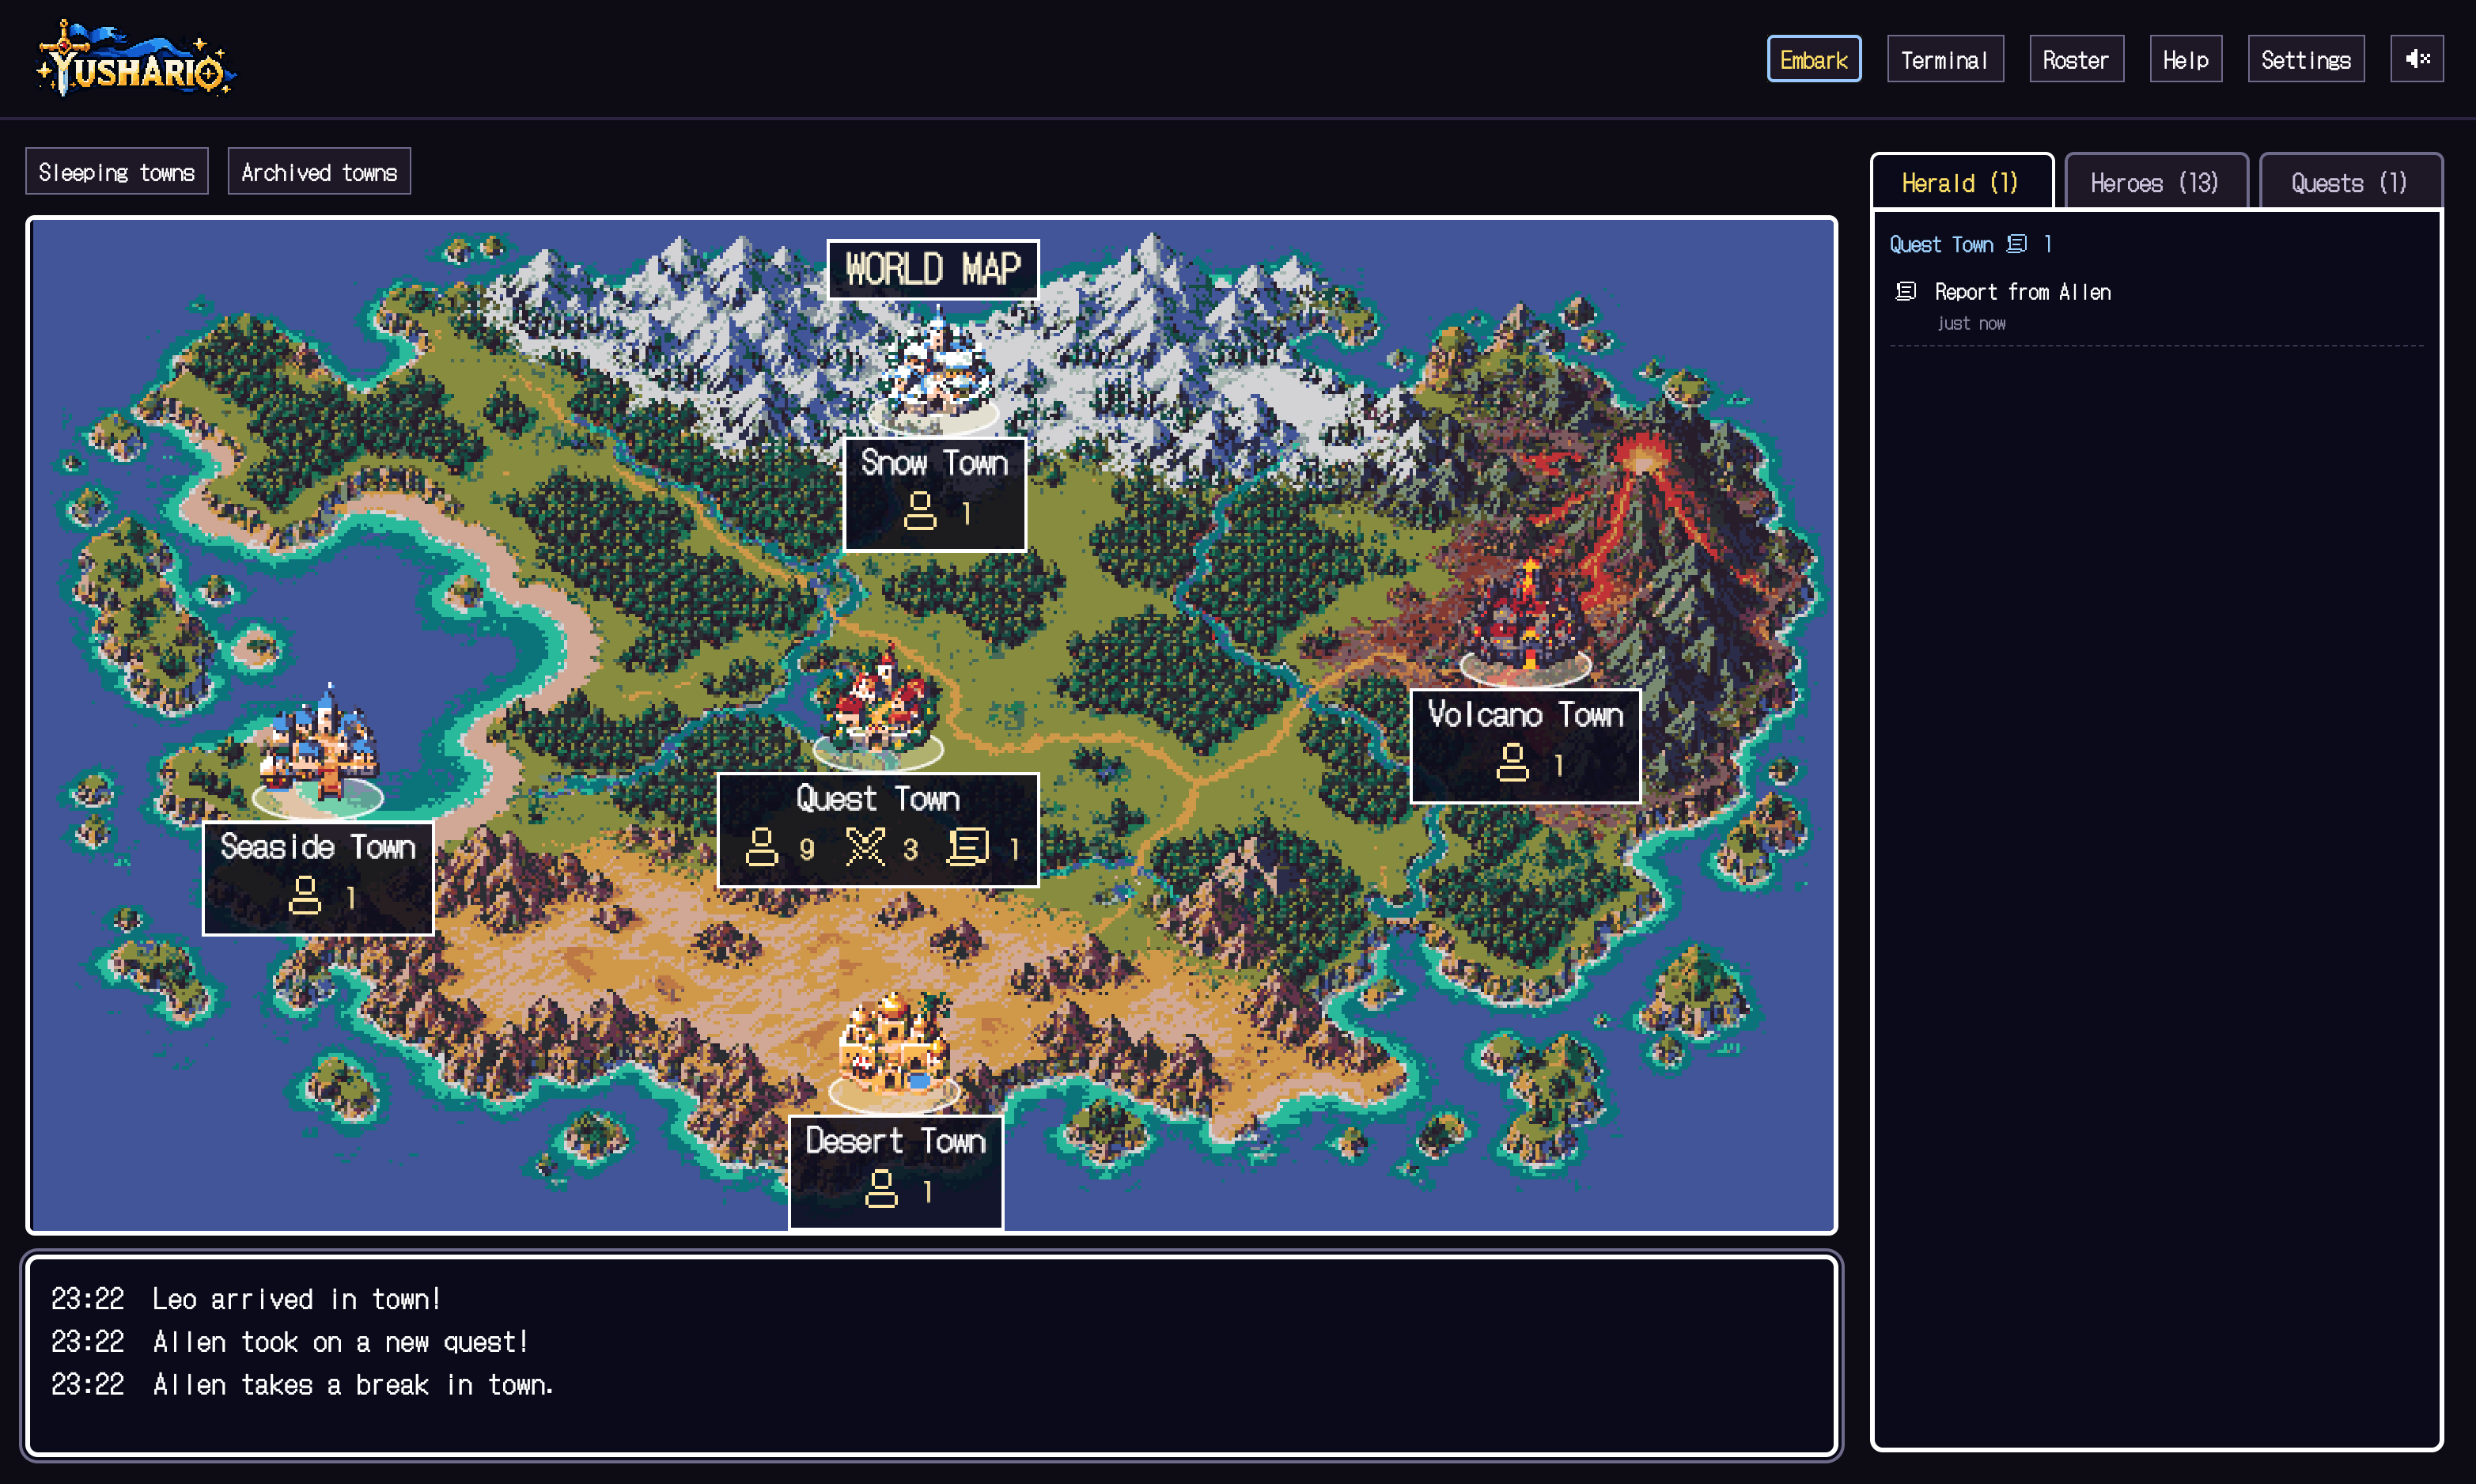
At first there are no heroes and no quests. Just remember "Embark" at the top and "Quests" on the right.

The world map right after launch. There is Embark at the top and the Quests tab on the right.
Real screen right after launch, in an empty capture-only environment Click the image for full size ↗
  1. EmbarkThe entrance for launching a CLI. Choose your project's folder.
  2. QuestThe entrance for writing work, choosing an owner and checking reports.
01

Pick a hero and a destination.

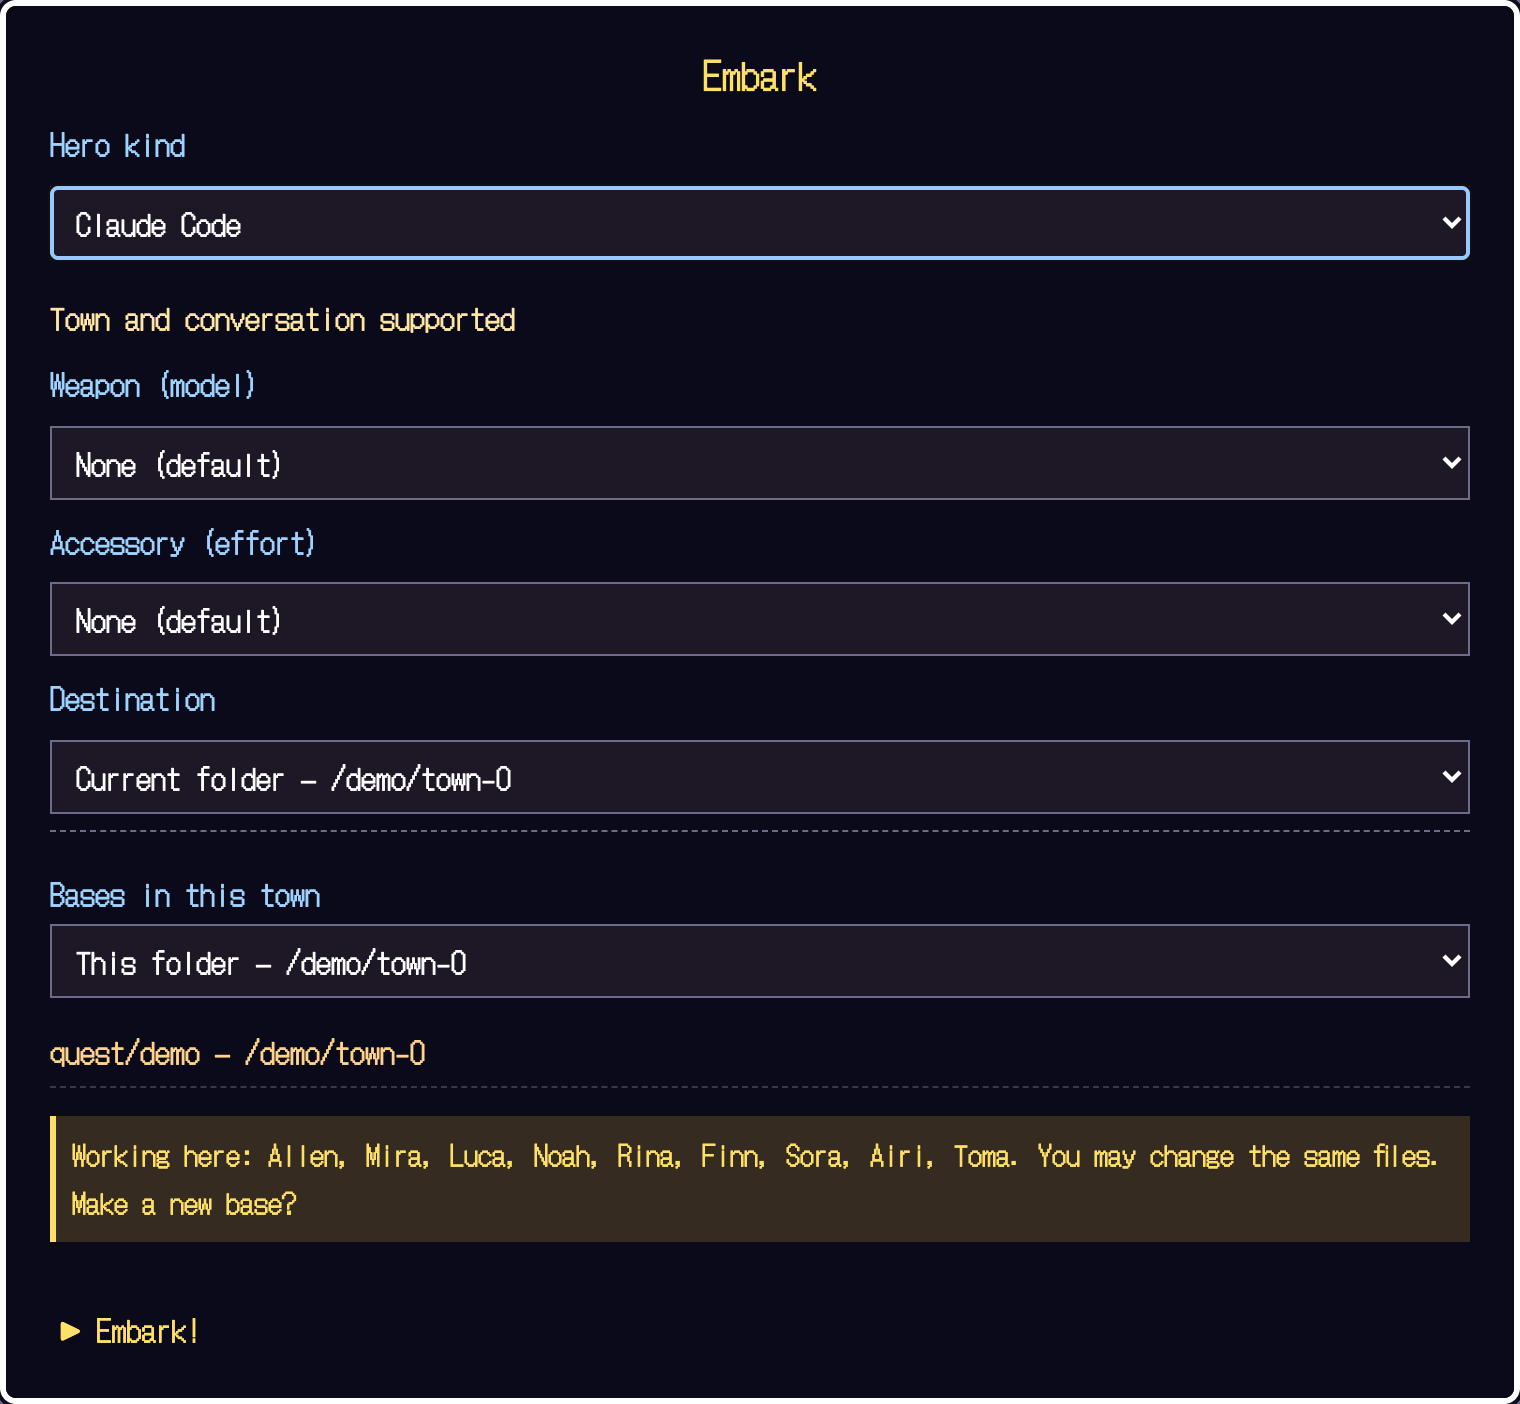
Open "Embark" at the top. You can start without changing any equipment.

The Embark window. Choose the kind of hero, the destination and base, then press Embark!.
The real Embark form Full size ↗
  1. Choose a logged-in CLIClaude Code in the example. pi and Codex are available too. A shell doesn't become a hero; it is terminal only.
  2. Choose the folder to work in"Destination" is your project. For somewhere else, choose another folder. The path in the image is a temporary folder used for capture.
  3. Press "Embark!"The CLI launches. If a trust or login prompt appears, check it in the terminal.

▶ When done: a hero appears in your project's town.

Codex needs a /hooks check and the first request sent from the terminal.See what's supported

02

Write a quest.

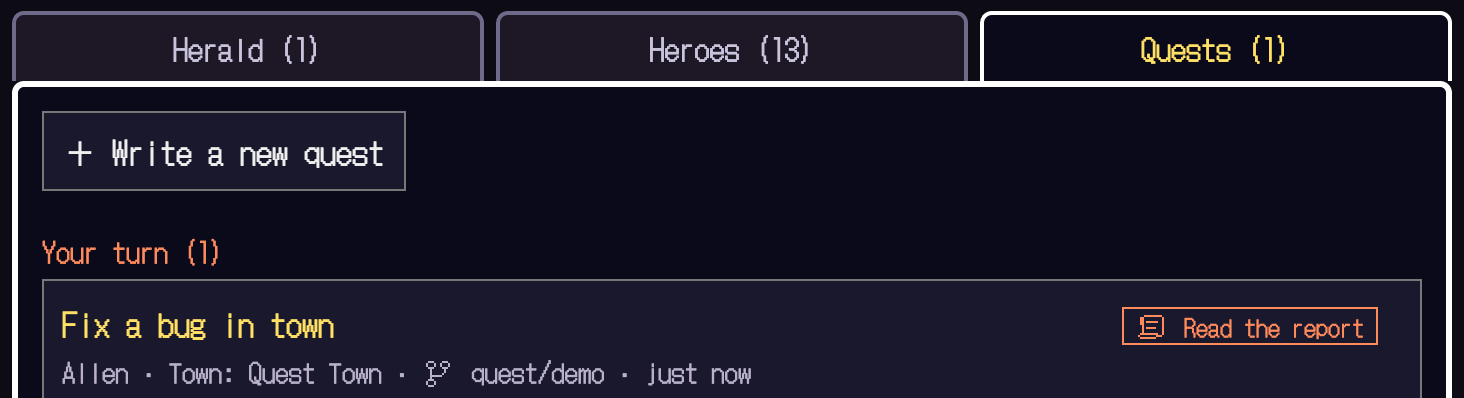
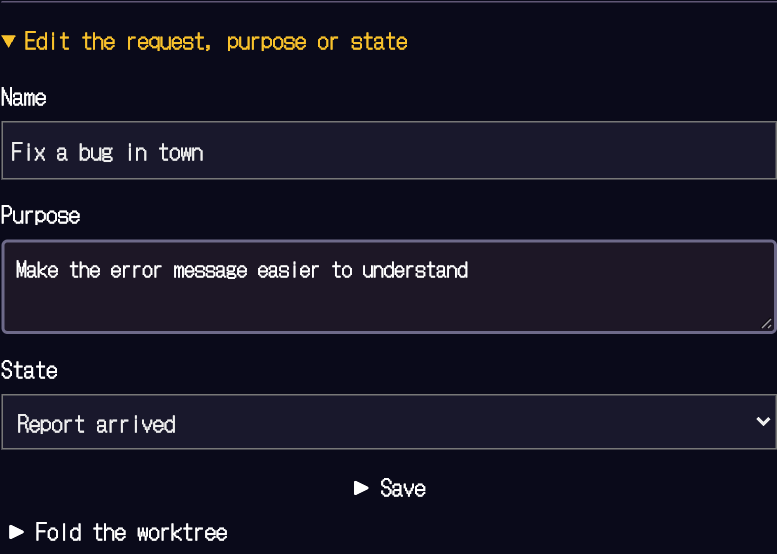
Go to the "Quests" tab on the right. After creating one, you can polish it from the card's "Edit the request, purpose or state".

A button for writing a new quest above the Quests tab, with the cards for existing work below.
The Quests tab on the right (a demo with an existing card)
"Edit the request, purpose or state" opened. It has name, purpose, state and a Save button.
The edit area of the card you created Full size ↗
  1. "+ Write a new quest"Type the title of the job to create a card. Open an existing card by pressing its title.
  2. Give it a short nameMake it easy to find in the list. The example is "Fix a bug in town".
  3. Make the purpose concreteWrite what to fix and how to verify it. The image specifies fixing an error message and running tests.
  4. Press "Save"This only records it. Sending the instruction to the hero comes in the next step.
03

Assign a hero.

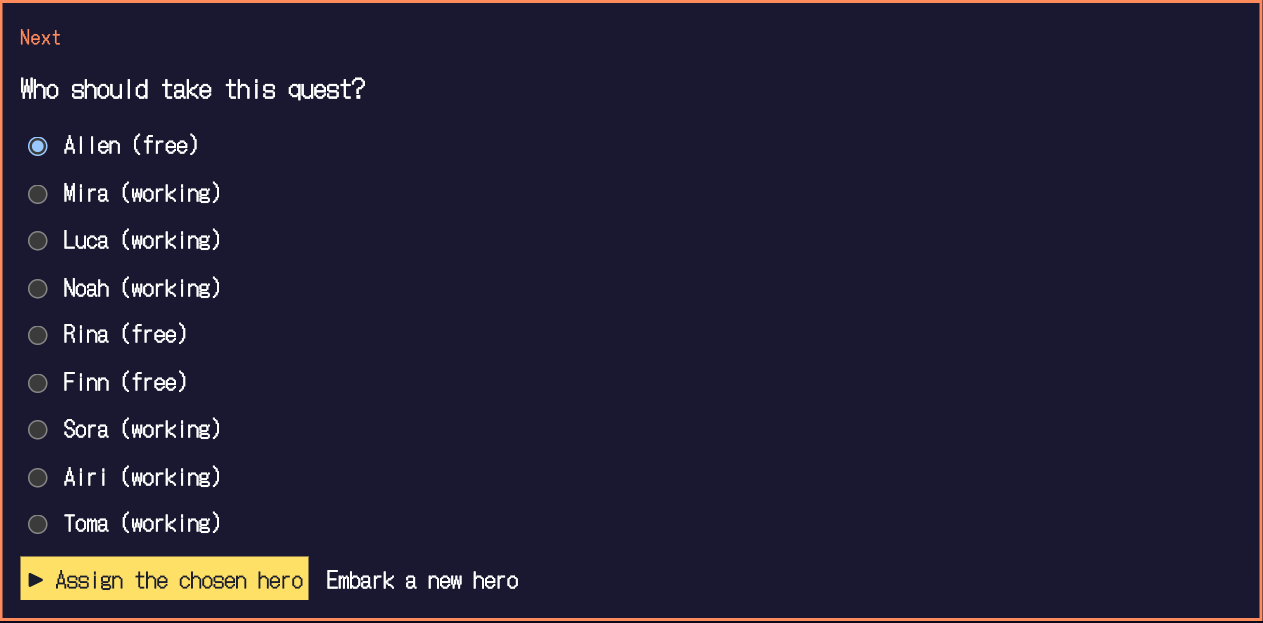
Look at "Next" at the top of the card. This is the screen when the work hasn't been assigned yet.

The screen where Allen is chosen under "Who will take this quest?" and "Assign the chosen hero" is pressed.
A quest with no owner yet Full size ↗
  1. Choose the hero who will take itIn the example, Allen, who is free, is chosen. If there is no hero yet, go to "Embark a new hero".
  2. "Assign the chosen hero"This decides the owner. The request itself is not sent yet at this point.
3+

Big jobs, big party.

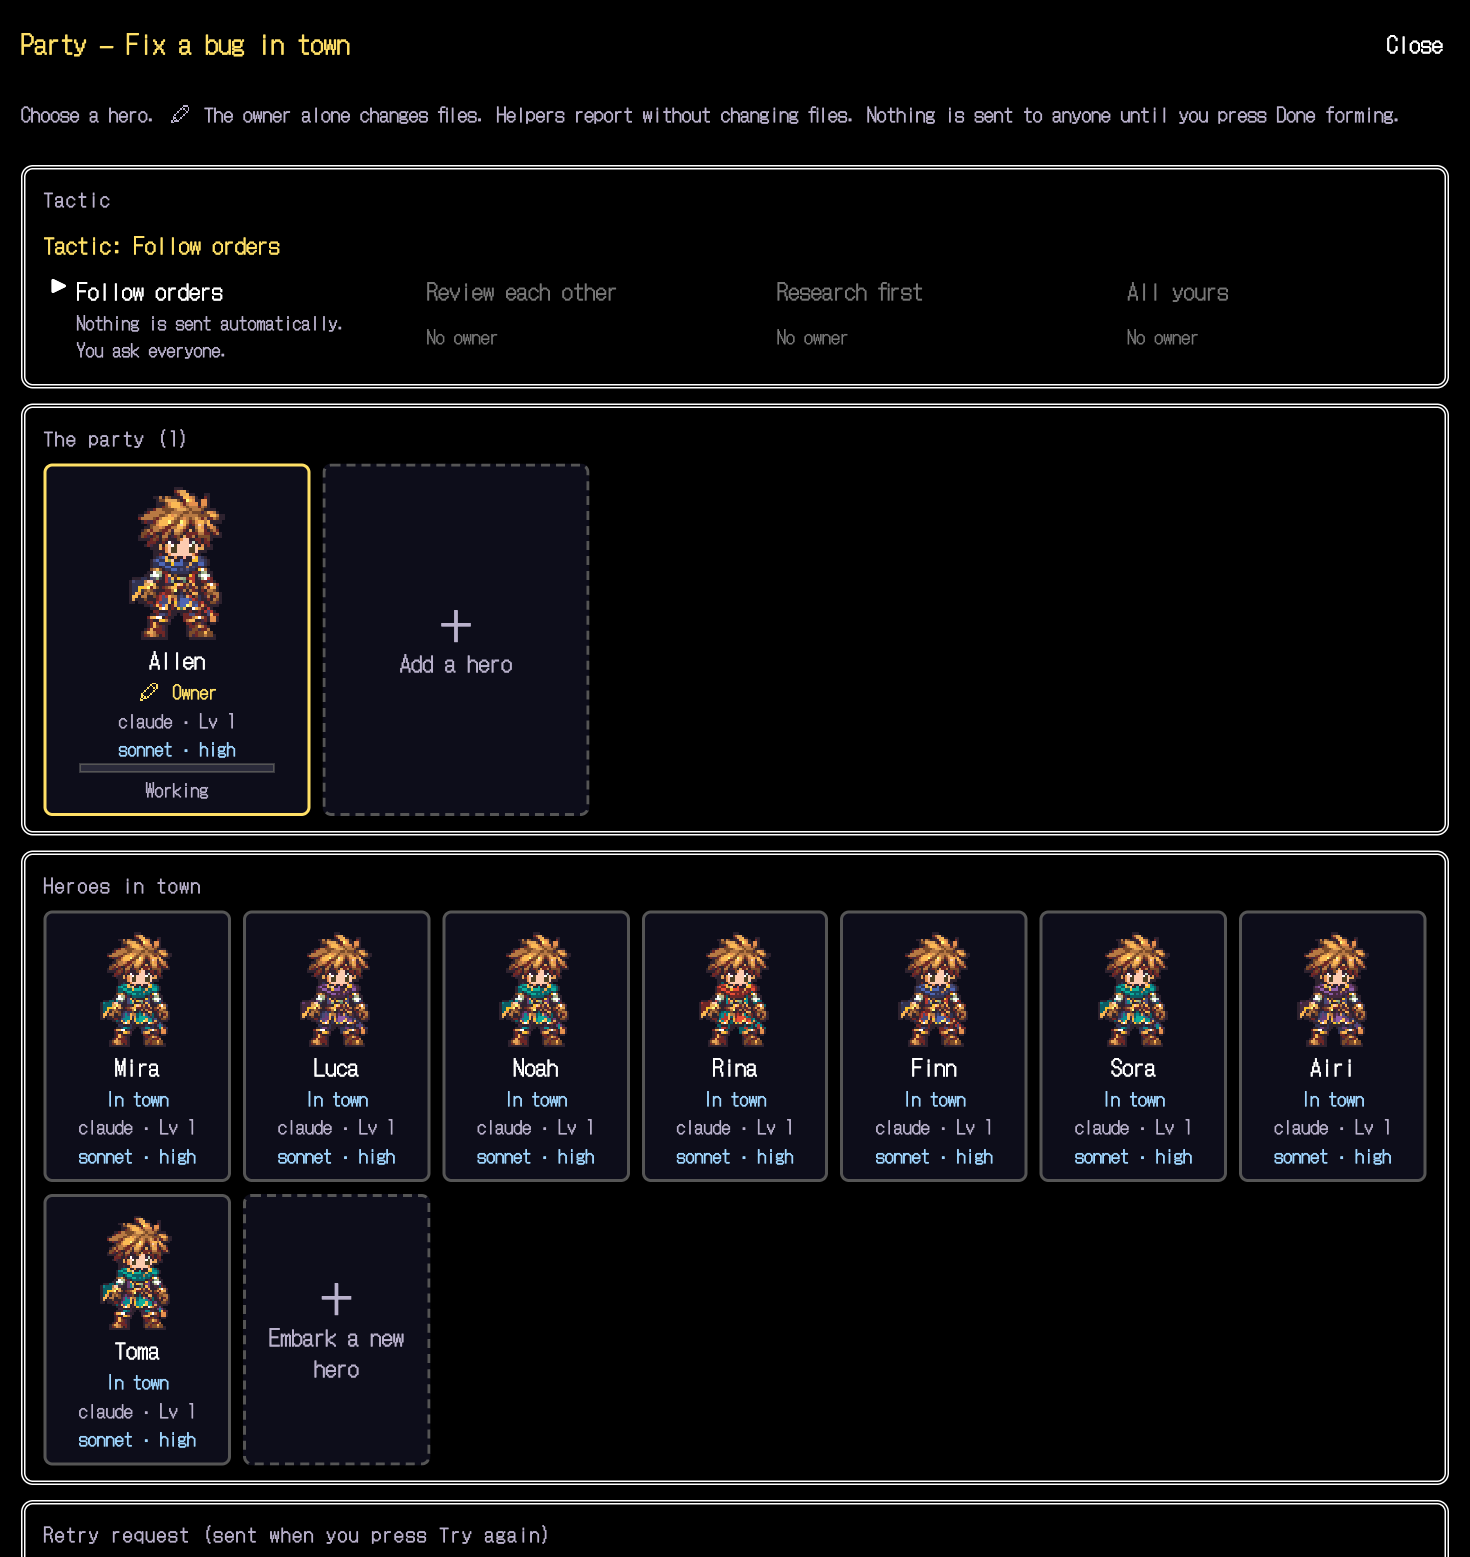
Open the card's "Form the party (heroes, roles, tactic)" to get a Dragon Quest–style party window. If one hero is enough, you can skip it. The allies here are separate CLI heroes you started yourself — a different mechanism from the subagents like Warrior and Thief in the roster.

The Party formation window. Tactic, current party and the heroes in town are lined up.
The party formation window Full size ↗
  1. "Add an ally"Add free heroes in town as helpers. You can also choose "Embark a new hero".
  2. Only the owner changes filesOne hero does the rewriting. Helpers don't change anything; they handle research and reports.
  3. Choose a tactic"Follow orders", "Review each other", "Research first" or "All yours". You can use them after checking whether the formation fits.
  4. Nothing is sent automaticallyNo request is sent until you press "Done forming…". Permissions are never auto-approved either.
04

Review, then send.

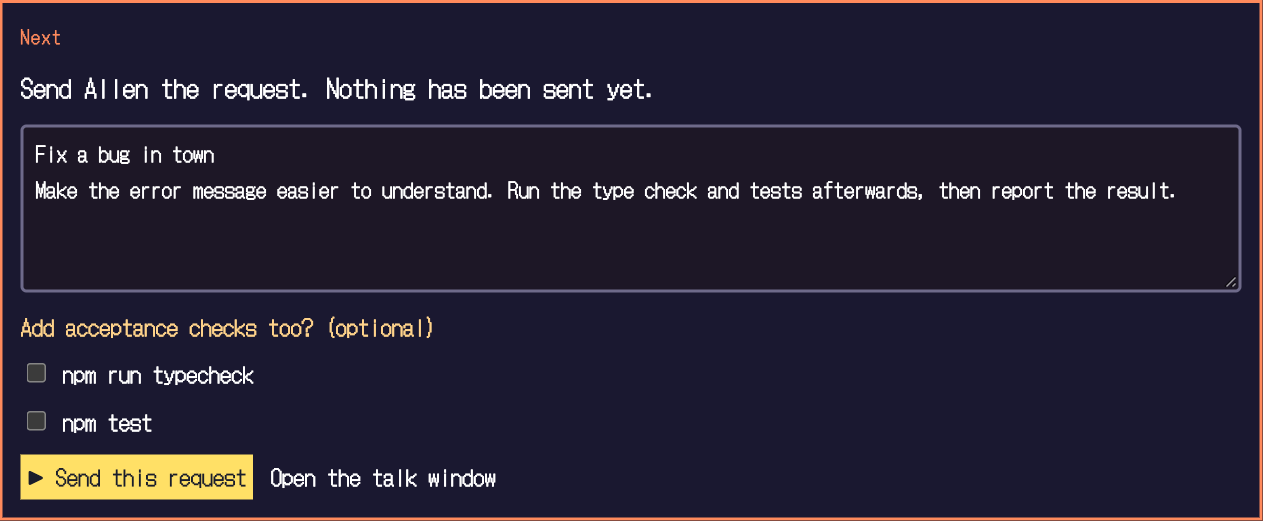
Once an owner is chosen, it changes to "Send the instruction". Nothing is sent automatically, so you get a last look with your own eyes.

The instruction box for Allen and the Send this request button. An example asking for an error message fix, with a type check and tests.
The draft instruction with the purpose filled in Full size ↗
  1. Check the text that will actually be sentUse the draft made from the purpose as it is, or rewrite it. If suggested pass conditions appear, choose the ones you need.
  2. "Send this request"Only now does the request reach the hero. If the hero is busy, it is held and delivered when they're free.

▶ When done: it changes to "Working". Watch the town and fields while you wait for the report.

05

Appraise the changes.

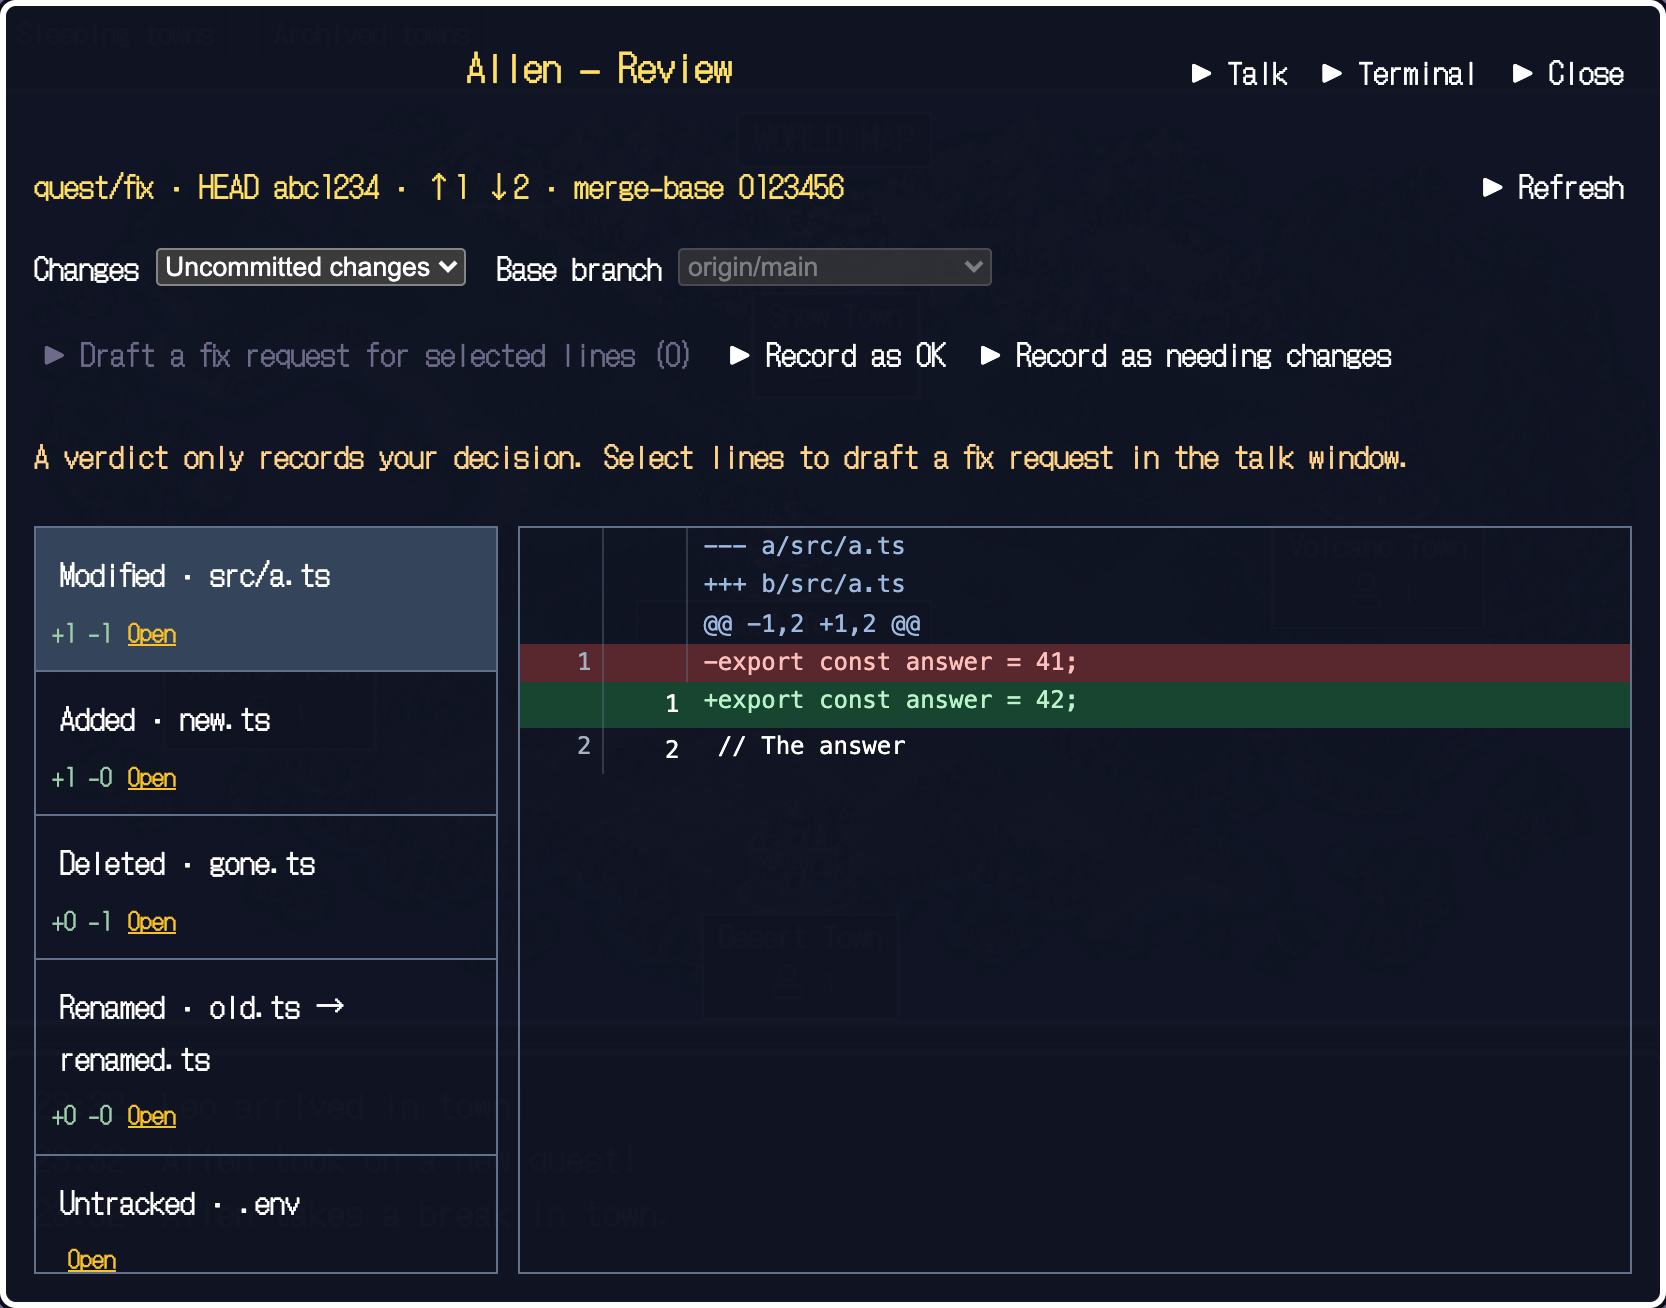
When a report arrives, open "Look at the changes (review)" on the card. Check the actual code changes, not just the reply.

The review window. The compared range is at the top, changed files on the left, red removed lines and green added lines on the right, and Record as OK and Record as needing changes buttons at the top.
The demo's Git diff. The code and file names are fictional Full size ↗
  1. Check the range being comparedChoose uncommitted changes or the whole branch. For the whole branch, check the base too.
  2. Choose a file from the leftCheck additions, changes, deletions and the change in line counts.
  3. Read the changes on the rightRed is removed, green is added. If something needs fixing, use "Record as needing changes" in the review, or "Ask for another try" on the card.
06

Check the marks, then adopt.

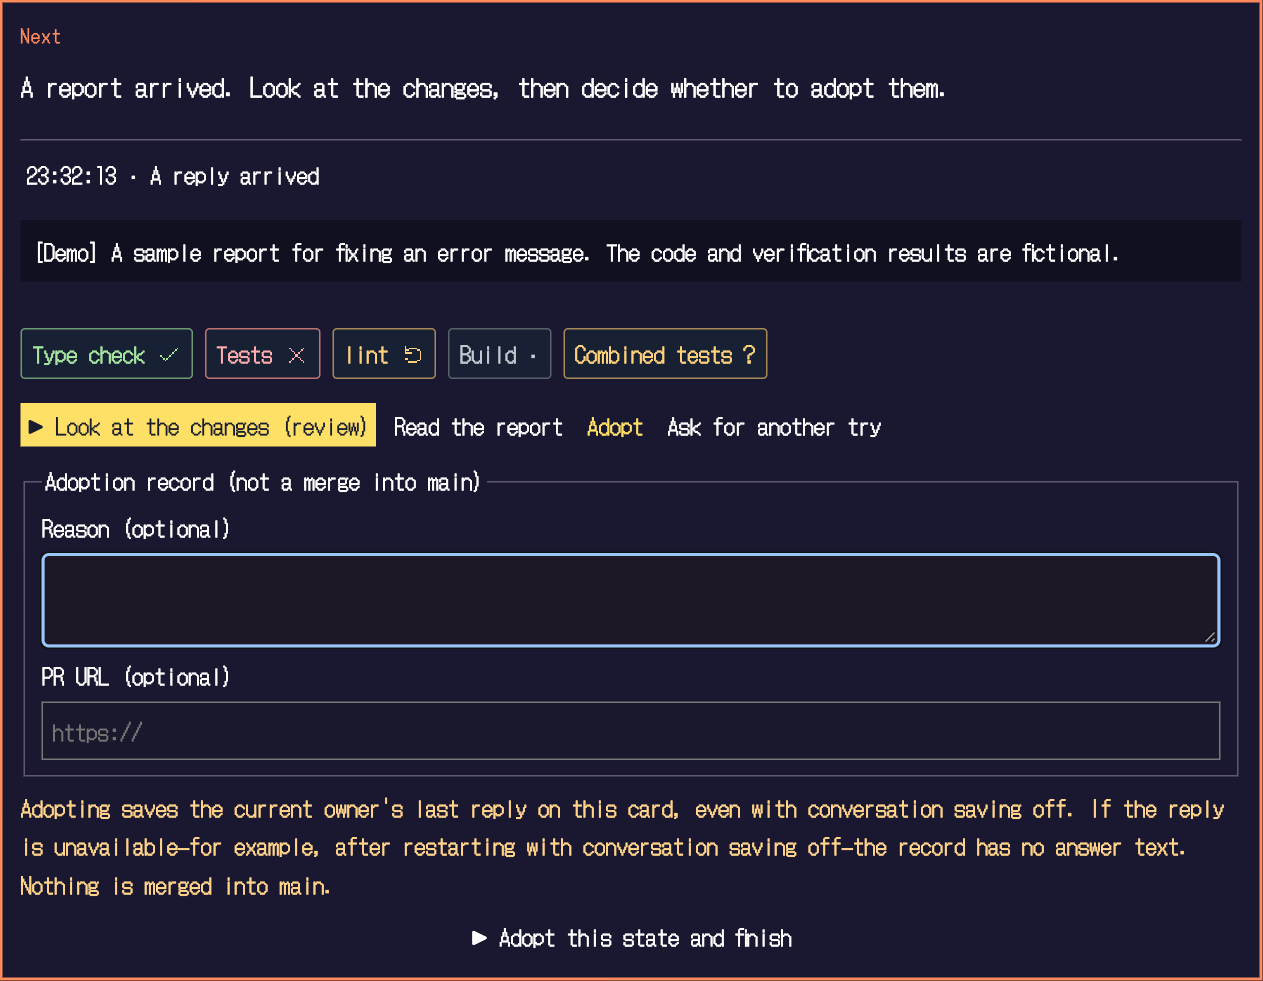
Close the review and return to the card. Here is the card with "Adopt" open. "Record as OK" in a review and "Adopt" for the quest are separate actions.

A quest with a report. The check marks: type check passed, tests failed, lint stale, build not run, combined tests unknown. Below are the reason for adopting and the Adopt this state button.
A demo with mixed verification results Full size ↗
  1. Check failed and stale marks, not only passesIn this example the tests fail. First look into the result and, if needed, ask for another try. It matters not to assume that unknown or not-run means passed.
  2. Leave your reason for acceptingCheck the content and, if you're satisfied, adopt it. You can optionally record a reason and a PR URL.
  3. "Adopt this state and finish"A record of accepting the current version is kept and the quest is complete. Merge, push and PR creation are never done automatically.

When you adopt, the text of that round's report is saved too (even if "Keep conversations too" is off). Check that it is fine to make public.

The images were captured from a demo using an empty capture-only environment and the same UI as the app. Names, requests, code and verification results are for illustration. The yellow numbers are this guide's annotations, not app buttons.

HANDBOOK

Everything else, in one place.

Reading the town and heroes

Town / World
Project / a list of projects. Worktrees of the same repository share one town.
Hero / Ally
A CLI session / a subagent. Click a hero to operate it.
Quest
A work ledger that outlives the session. It gathers the title, purpose, owner and checks.
Lv / HP / MP
Finished jobs / few recent failures / remaining conversation. Not a code quality score. Values that can't be obtained are shown as unknown.
Herald / Treasure chest
Notices such as awaiting a decision / reports of finished work. A person confirms permissions and results.

Working through a job

See the screen-by-screen guide ↑

Quest → Assign → Send the instruction → See the report and changes → Adopt.Use "Talk" to give a hero a request, and open the real terminal of the same session if needed.

Form a party when handing work to several heroes. Check roles and who rewrites, then choose a tactic. Yushario itself never calls an LLM or auto-approves permissions.

"Checks" are evidence based on results and work state delivered by hooks. They tell "not run", "passed", "failed", "changed" and "unknown" apart. Registering a condition does not run the command.

Supported agents

What is supported now
CLITown, heroesGood to know
Claude CodeSupportSupports permission prompts. In auto mode, prompts rarely appear.
pi 1.0.2Supported, with conditionsThe extension loads automatically when Yushario starts. The verified environment is Node.js 26.4.0. In our audit environment, the combination with Node.js 22.13.0 was checked to exit right after launch. Other pi and Node.js combinations are unverified.
Codex 0.162.1 ※Supported, with limitsCheck hooks with /hooks; the first request and permission answers come from the terminal. Automatic verification evidence, the list of successful edits and MP are not captured.
shellNoneOnly the embedded terminal is available.

More supported agents are planned. Every one needs you to meet the CLI's own terms, requirements and authentication. Node.js 22.13.0+ is a requirement of Yushario itself and does not guarantee how each CLI works. Your personal CLI config files are never rewritten.

It runs locally.

The app listens only on 127.0.0.1 and is protected by a token that changes on every launch. The terminal runs with your own privileges.Don't expose it through a public proxy or tunnel.Each CLI's communication with its model follows that CLI's settings and terms.

Quest titles, states and report summaries are stored in a local SQLite database. Saving the text of requests and replies is off by default. However, when you adopt, the text of that round's report is also saved. The title (the first line of the request) always stays. Terminal output is kept in memory only. You can delete records from the app's settings.

HELP

Stuck? Start here.

No hero appears in town.

Check that you launched a supported CLI from Yushario's "Embark". A shell does not show a hero. Finish the CLI's login and folder trust prompts in the terminal. Codex needs a /hooks check and a first request.

I got disconnected, or an old URL won't open.

The token changes on every launch. Use the new URL given by the server that is currently running. Just losing the browser connection does not end the CLI session.

I stopped it but it still shows as working.

A stop request and a stop confirmation are different things. It isn't shown as stopped until the confirmation arrives. Open the terminal, check the CLI's state and do any recovery that is needed.

I ran the tests but the check never shows as passed.

Check the conditions, the command and where it ran. Complex commands and results that can't be read become unknown. A change after verification can also make the evidence stale. Codex hooks create no automatic evidence.

I want to switch the screen between Japanese and English.

Change it from Settings → Language in the app. The first time, it is chosen to match your browser language.

If it isn't solved?

GitHub Issues. Include your OS, Node and CLI versions, and the steps to reproduce. Remove tokens, conversations, absolute paths and API keys before sending.